|
| Online Projects |

|
Westfield's & other 7's
Page 2 of 2 [back to 1]
The Orange Westfield. It gets better as
it goes on !!. |
|
|
|
A rather "Stunning" Westfield 3.9.
Efi in Stunning "Orange" (We really really like the color)
In this section you will see more details and pictures on
the failings of the Stock Westfield injection system and how not only to cure
it but to surpass engine efficiency such as you could never
believe. |
|
|
| Some bad points first |

|
 |

|
| The lower pulley is easily removed, but first you need to
remove the Oil Cooler bracket. |
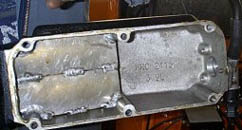
This is the underside of the plenum chamber, If this is how
they leave the factory then it says little for there V8 Engine abilities
|
The power loss through the stock injection manifold can soon be
replaced by using some Rpi Specialist components. |
Westfield Project, Stage 3 Head
Conversion and injection upgrade.
 With the plenum mods, re-chipped and stage 3
upgrade, This Westfield Seight is now producing a very healthy 220bhp with
amazing Torque. With the plenum mods, re-chipped and stage 3
upgrade, This Westfield Seight is now producing a very healthy 220bhp with
amazing Torque.
|
The project started, first the bonnet,
had to be removed and the complete nose cone. Three bolts held the nose cone
on, all the electric's we're disconnected (after battery disconnected), all
coolant pipes removed, so front cone could be removed.
All ancilaries, we're next to be removed i.e. coolant/fuel/engine loom/ air
intake, once this was done, parts of the engine we're removed, inlet manifold
(complete), exhaust manifolds, these we're very difficult to remove, as the
engine, was very tight in the bay, I was lucky enough, to have been blessed
with small hands and managed to undo them. The brake reservoir, had to be
loosened, so that I could get a socket extension, in on the rear exhaust
manifold bolt, once this was done, the down pipes, were then taken off, so the
manifolds, could be taken out for machining. These would be sent away, to be
machined, to increase the gas flow, for the stage 3 heads. Next the rocker
covers were taken off, the rocker shafts, push rods and cam followers. The push
rods and rocker shafts kept together, in order, of there removal. Both the
heads were then removed. The next stage, was the front timing cover, on the
Westfield, an oil cooler, had been fitted. First this was removed and the
bracket, holding the matrix, in order to get to the front crank, pulley bolt.
The engine was locked and bolt removed, along with the pulley, the timing cover
was then loosened, including the two studs, in the sump, however trying to
remove the timing cover, in one lump, proved to be a problem. There was not
enough room, to pull the timing cover, through the frame of the Westfield, so
the water pump was removed. Just managed to get both parts out, the timing
chain and pulleys, were then removed and also the camshaft. The engine was now
ready to start, the stage 3 conversion . |
|
 |
 |
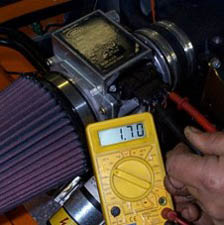
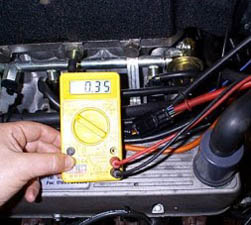
| setting up the Air Mass Meter and Throttle Pot to
the Correct values. So important when seeking the edge. |
|
|
| ...and Finally The new stage 3 heads, were fitted and
torqued, to required spec, followed by the camshaft, followers, push rods and
rocker shafts. The pre-loads on the followers, had to be adjusted, this was
done by fitting different, sized shim, under the rocker shaft, mounts, until
the required pre-load, was reached. The inlet manifold gasket, was fitted,
followed by the inlet manifold, it self. New front timing gears and chain was
then next, then the cover and water pump. The crank pulley was re-fitted, along
with the alternator, oil cooler system and machined exhaust manifolds, as
before this proved to be a major operation, getting the bolts back in. Next
both the rocker covers were fitted and all the wiring, for the injectors, all
the pipes, fuel and water. The nose cone was then offered back up, to connect,
electric's and hoses to the radiator. The nose cone was then fixed back into
place via the three bolts. Oil and water was, put into the engine and radiator,
ready to fire up the engine, for the first time. The engine was turned over,
until the oil pressure light had gone out and then she was started. She burst
into a roar of thunder, this baby would go like a rocket. If it had wings, it
would take off !
|
|
Below you can see some of the problems
caused by Poor fueling The causes are from use of the Std Rover ECU Chip, bad
port matching, bad intake (plenum) modifications, bad air filter arrangement
and poor quality stock distributor, replacing these alone will give staggering
returns, but going further to stage 3 will always provide the best results with
no losses, not even to economy.
 |
 |
 |
 |
| After only 2700 Miles these Pistons Show it all. This engine
has a severe Over-fueling problem, and whats more, "Its not the only
one" |
Blackened Exhaust Manifolds show previous
Bad miss-match of ports. and below, our Stage 3 Heads Fitted & Ported
|
The J+P Duplex Timing Chain Kit Is far superior to the Stock
Rover Timing Gear and fitting is simple. |
The Exhaust Manifold Ports Have now been ported and Matched
precisely to the Stage 3 Heads Prior to refitting. |
|
| .And now he (The Owner) has his Westfield back. ?
I must
complain about the Westfield. So much for me taking it easy on the way home
from you last week, I enjoyed it so much I nearly 'did an off' at a roundabout
when I misjudged the speed and subsequently very nearly spun the car when
pulling away! Seriously though, it has made quite a difference. I notice little
difference until about 3000 rpm, at which point, the car comes alive, all the
way around to just under 6000 rpm, it makes a totally new noise and really
kicks me in the back! Considering I never really revved it over 5000 before, it
seemed to run out of steam at this point, it is really quite impressive. It is
just so much more responsive. Le mans... fantastic, we hit 140mph on the way
down and the car got there and back without a hiccup, 700 miles on a freshly
rebuilt engine, I was impressed! These engines are completely wasted in your
Range Rovers! For info, when I got the car back home from Norwich (approx 100
miles) it leaked a few drops of antifreeze overnight. When we got to Dover, a
bit of oil was flecking out from the side of the bonnet, I think I have a
slight leak on the oil filter remote housing. I kept an eye on the levels (no
problem) and I'll sort the leaks out in the coming days. As it wasn't a
problem, I didn't want to fiddle with it in the middle of France, its a 'nose
off' job, and those bolts are not the most convenient! So, when can you develop
a carbon fibre plenum chamber? The thing I'm not sure about is just how many
injected Westfields there are out there... hardly a figure you could get from
the factory! Certainly, at the 'local club' all the Westies are four cylinders.
Either way, if you develop one, I'll happily stick an advert in the Club
magazine and post an entry on the club 'newsgroup'. Finally, give me a shout if
you get some cheap 4.6 engines in! This must be the next step... I'll be making
this a winter project I think... yes actually do it myself!
Thanks, Graham.
|
Visit our Westfield
"Picture Gallery" (Click here)
|
The
following information and chart are another Westfield, seight, and this one has
not gone all the way with head and cam upgrades but you will see the
improvements from standard are still very real
Another 3.9 Efi Westfield shows the gains that are so easily available
The genuine results.
Here |
| |
|
|
|
|