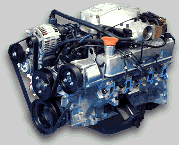
 Gems Engine Management - General overview & FAQs. Gems Engine Management - General overview & FAQs. |
Gems Engine management found on all 4.0 & 4.6 Range Rover models from late 1994 to late 1999 (and late date US spec Discoveries).
Essentially Gems (Sagem) implies it is equipped with an OBD-2 (on board diagnostics) style (Sagem) engine management computer. Unlike previous models ( Range Rover Classic) the Sagem system has the ability to constantly monitor its performance and make logical adjustments to itself, and also record previous faults it may have encountered. The main problem it has is that it is constantly trying to maintain the compromised settings installed by the original manufacture.
On this page you will learn how simple it is to not only remove the robust security Rover have pre-installed to lock out any future upgrades, but also how to improve on your std. engine's efficiency. It's so easy that you can gain all you need without any compromises.
That's Torque, Bhp and Economy. So sure are we, that we offer an unconditional return to base no quibble warranty.
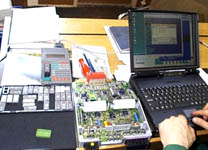
The Gems ECU is interrogated by our lap top.
The fuel and ignition maps are redefined to gain added power and torque, and the robust security is overwritten, allowing for any other future engine upgrades. |
 |
For stock engines you can easily expect 10%-15% improved torque throughout, more bhp when needed and proportionally improved fuel economy.
Some noticeable differences are unlike all previous model V8 engines (Sagem), Gems has done away with the engine's distributor and now takes its ignition pulse signal direct from the flywheel, allowing (theoretically) far better control of engine management.
As you would expect, this doubles the advantages from our chipping upgrades as we fully re-map the ignition [as well as the fuel map] to one of superior efficiency (normally 10-15%) throughout the engine's rpm and load range.
,
Essential for LPG conversions. Whilst some may tell you otherwise, it is not possible to do a correct LPG installation without 'Sagem' re-chipping. The main issue is with the engine monitoring (OBD-2). What's happening is the Ecu is constantly making adjustments and seeing no change, this will throw it into default (limp mode), especially quickly if you are a high demand driver, and, while the vehicle will still run, you can expect possible LPG engine backfire and very dull performance as it (Sagem) will retard its base ignition timing to almost zero advance.
Other advantages of Chipping for LPG conversion. Apart from stopping/preventing the ECU going into 'limp mode', chipping for LPG will allow the extra timing advance required by the higher octane rating of LPG (112 octane), thus exploiting far better engine performance through corrected ignition appropriation.
Consequently, we guarantee [if your current ECU is std.] this upgrade to your fully appropriated LPG conversion, will make it more powerful under 4500 rpm than its previous petrol performance, especially at low rpm high load areas, and under both mild and hard acceleration (normal driving & more).
Essential for all 4.0 & 4.6 engine upgrades for pretty much the same reason as needing to chip for LPG, even the slightest change such as an exhaust system change or free flow filter will not register any favours with the ECU, and it will continually fight against any extra fuelling requirements to make the best of the upgrade. Indeed, it will always try to restore factory default settings, thus undermining anything you have done.
Gems Chipping can save you more than just running costs. Indeed, if you check out our FAQ section you will see that there is a known and common issue regarding the engine running with abnormally high internal engine temperature conditions (due mid range, weak combustion) this leads to engine block cracking (failure) leaving you faced with no other option than to replace the complete engine. Thus far we have replaced many hundreds that have suffered this fate. See engine-4.htm#overheating3942
GEMS upgrades (at our end only) are actually quite complex. The ECU has two chips which are both in sockets, in addition the ECU is also keyed to the vehicle it belongs to (Body Computer BECM). Therefore the upgrade process has to be performed on the vehicle's own ECU. There are no known emission problems with this conversion, indeed you can expect emissions to improve. The only major difference between this and the North American Spec. version is that NAS vehicles have four Lambda sensors, whereas European vehicles only have two. This is no longer a problem for us as changes have been made to our NAS Chipping package to allow for the slight differences caused by this.
Why is Gems chipping more expensive than a conventional fuel chip? Unlike most chipping, this is not just a device for pushing higher levels of fuel into the engine at higher revs. for more bhp alone. Indeed the opposite applies. We have spent exhaustive months/years on full rolling-road testing & tens of thousands of road miles, checking and re-setting the entire rpm range both at cruise and under all load conditions to be sure of reclaiming all available efficiency. This applies to corrective settings for both Fuel and Ignition load sites.
However, this alone is not the full reason for the cost.
Uniquely, we have two chips to reprogram, not just one as normal, as the Sagem (GEMS) ECU upgrades involve re-mapping both fuel and ignition maps. Also, with the need to protect our software, the two Eproms are supplied with 2 additional scrambler sockets, each containing a unique scramble/descramble Eprom for which we have to pay a very expensive royalty for the use of this protection software. With this in mind, it is easy to see that these chips are a very reasonable price for so much effort & so many gains, indeed with the added economy you can expect them to pay for themselves in a very short time.
The break down would look like this.
Ignition Re-mapping Chip œPOA
Fuel Re-mapping Chip œPOA
Two royalty-paid Scramble Sockets œPOA
We hope you agree that when looked at correctly the price is fair.
Other chip options. We have developed our extensive range of Gems (Sagem) fuel and ignition maps for all engine variations. including 4.0, 4.6, 4.8, 4.9 and 5.2 (and most, if not all, worldwide variants) we can also do bespoke fuel maps for seemingly unlimited power outputs.
Some Popular Questions Answered
Sagem ECU chipping is very much a DIY installation except for US models where the ECU will need sending in for unlocking, also if you are wishing for a capacity upgrade form 4.0 to 4.6 then unlocking is also an issue. We would, however, offer the fastest possible turnaround and take care of the safe return. 'update may 2002' (However for Range Rover models only, retaining the same capacity you no longer have to send them in as we have coded our chips to work straight out the box)
>What are the gains from a chip install only (no Lpg cam, exhaust or other upgrade)? up to 10-15BHP all models, 10-15% better gas mileage, huge increase in mid load torque. the chip upgrade is also compatible with selected cam upgrades without modification.
>Could Chipping lower engine temperature? The fuel map in all the later 4.0 and 4.6 ECUs are (ex-factory) very weak on the mid range fuel/air ratio. This is beginning to cause problems with engine internal temperature, and can be the cause of valve guide, or worse still, shifted liner/cracked block problems. This, however, is normally in countries running very low octane fuels, but the advantages are for all (see comments at the foot of this page). Also see our FAQ section dealing with this issue 'here'
>Does it change exhaust gas? (nearly all US states have exhaust gas tests) Not on cruise or idle. The mixture is slightly weaker around there, which produces slightly more Oxygen in the exhaust and a slight increase in NOX before the Cat which eliminates the NOX, and the extra Oxygen improves CO values. No effect on Cat life.
>Will it work with all North American models? 4.0 Defender 90, Range Rover 4.0 and 4.6 and Discovery 4.0, are now no problem at all, it took a few modifications to get there but with many now enjoying this upgrade Stateside, we are now completely happy with the results.
>Will it allow me to run on LPG? The ECU upgrade is essential for all LPG conversion (see both Chipping and LPG section on this page).
>What is the install time? It's no more than 15mins under the bonnet and the simple 'Plug and Play' installation of just two management Chips (full fitting details and pictures at the base of this page )
>What other advantages can you offer? We can easily remove the road speed limiter and refine other parameters in the GEMS ECU but this would mean you would need to send the whole ECU to us.
>Why not Supercharge? Supercharging a Stock Engine is going to be destructive to your engine for the following reasons:
>With a supercharger fitted the problem is with the supercharging management (or lack of it) which tries to cheat the ECU with a ninth injector. However, the ECU of a GEMS system is not easily fooled, and soon detonation will occur internally, thus seriously weakening the Pistons (in extremes, a weak link in this new GEMS 4.6 engine) and removing any power gains that you may have initially had. There are also some serious problems with utilizing (in most cases) the stock intake manifold, causing the rear cylinders to run very weak, also most systems we have seen use the M90 Supercharger which, without all the above mentioned faults, is far too small and runs out of boost at just over 3000rpm.
If you want Power - Here's the way we get it.
Our Top of the Range 5.2 Engine conversion will idle from 600rpm, yet bring up 90mph in 15-17 seconds on an HSE Range Rover, and faster still on a D90, and, unlike the destructive tendencies of a Supercharger, these engine upgrades use Forged Pistons, Arrow or Wildcat Rods and are fully blueprinted, heat treated and balanced to ensure your engine is not only smooth, powerful and economical, but almost bullet proof. Indeed 600bhp is the estimated Power limit, so affording a large margin of error and second-to-none engine reliability.
My own 5.2 has now topped 40K miles in 2 years, and its just keeps getting smoother, with all attempts to stress it being taken easily in its stride, we also have these engine in place, in Asia, USA and locally (see our 5.2 sponsored off road Rally 'MATTSERATI' )
If a Monster engine conversion, is not for you, re-chipping alone will give smoother running and better throttle response and also improve mid-range torque to make gear shifts stronger and will also improve economy & power by 10-15% minimum.
Further Technical section is at the foot of this page
 Gems Engine upgrade, from 4.0 to 4.6 "or" beyond. Gems Engine upgrade, from 4.0 to 4.6 "or" beyond. |
Short Engine Upgrade
 4.0 to 4.6 upgrade, with brand new short engine, œPOA. 4.0 to 4.6 upgrade, with brand new short engine, œPOA.
Offering the same torque upgrades at this level. You would receive a hand built and balanced brand new 4.6 crossbolted short engine, we can also supply a full gasket set and head bolts as required. To either rebuild your existing 4.6, or upgrade your 4.0 Litre,
Long Engine Upgrade
 4.0 to 4.6 upgrade, with new long engine œPOA 4.0 to 4.6 upgrade, with new long engine œPOA
This is our most popular 4.6 engine. As supplied, this long engine is inclusive, 'Rocker covers to Sump'. To further enhance it, we can also fit a new timing cover & Oil pump making this a near drop in engine replacement or upgrade.
Example
Whilst we have many standard efficiency and power upgrades for your existing 4.0 or 4.6 engine, it is also surprisingly inexpensive to upgrade the capacity with a brand new guaranteed for Life RPi Engine.
This may be your best ever choice.
Engine specifications detailed here.
Conversion to 5.2. The 'optimum' road power spec'.
(We also do intermediate engine upgrades. 4.6, 4.8, & 4.9 litre V8 to Stage 1 or Stage 3 options)
Details and cost's £POA (long engine with ultimate big valve heads complete from rocker covers to sump with appropriate timing cover & new Oil pump.
For your Information. The 4.6 Crossbolted Blocks used to build the 5.2 are not new, as new blocks will move after the first years of use thus could disturb the tolerances of the precision engineering of these units to a degree that may become detrimental to the reliability and performance.
Only seasoned 4.6 crossbolted blocks are used for this reason. As all high accuracy machining will retain its intended tolerances.
Heads Due to the need to create 44cc combustion chamber size heads, all heads used are normally pre 96 type and will encounter a small difficulty in retaining later type power steering pump fixings, But remind me before we go to far and I will see if we can include the bracket update for you.
Further Updates and inclusions if required You can opt to re-use some items (to cut cost's) from your original Gems engine if you wish,
Please specify, if appropriate
We do however strongly recommend that we supply "All" as this further ensure's an engine to our exacting standards and ensures uppermost reliability for all concerned.
We Can now supply all engine covers and front timing cover with new oil pump plus new temp pressure senders. Included in the price.
Consider, Ultrasonically cleaned injectors, Plus NGK revised temperature plugs and Magnecor KV85 leads œPOA
Upgrade your injection system to. Big throttle body. ported & matched Intake & shortened ' ultimate big bore' 48mm carbon fibre Trumpets œPOA
To ensure perfect compatibility and to allow us to port match the intake, it is best to send us your existing equipment for modification (although exchange or outright is sometimes available) please allow a 14 day turnaround.
Performance Exhaust system and headers (matched) œPOA (Defender, Classic Range Rover & Discovery) with fittings, gaskets and manifold fitting to head, stud kit
And perhaps some added Engine show finish œPOA (you can leave it to us)
We will also take care of any other small details. not mention above but assumed included and appropriate.
 Gems 4.0 & 4.6 LPG Conversion Gems 4.0 & 4.6 LPG Conversion |
135 Litre Twin Tank configuration & no boot space lost!!
The two very distinct advantages are that both LPG tanks are underneath the car instead of inside. No load space is lost and the 135 litre capacity means an average of 300 mile LPG range from 110 usable Litreage.
We also now have an option for refitting the spare wheel and all fittings & trimming required.
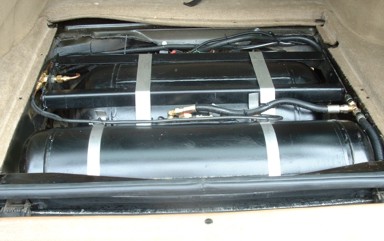
Here you can see the twin tanks installed.
Both tanks are held with stainless steel ribbon straps, and the smaller underslung one also has a mild steel additional pair of retaining straps.
The std. exhaust was in good order so it was decided to modify it rather than replace it (against our better judgment).
|
|
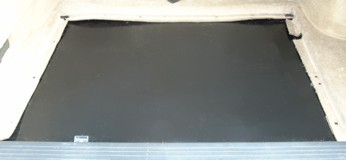 |
The tanks are blanked off by the false floor (as seen left) which is sealed and the screwed down. |
The finished product!
Loosing absolutely no boot space and visually no difference, this is the most common tank configuration for the Range Rover 4.0 and 4.6 Litre and by far the best. |
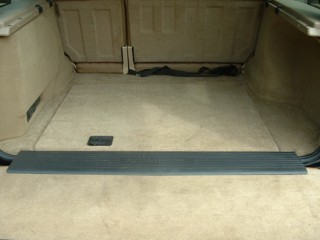 |
More Gems ( Sagem) Lpg conversion information, "Click Here"
|
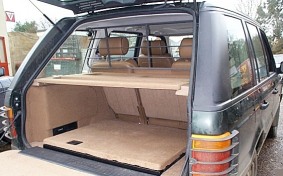 |
it is now possible to fit our 80 Litre (4 Hole) Toroidal tank without any loss of boot-space. and although it takes up the spare wheel hole as per the 70 Litre Tank shown above, modern puncture proof compounds such as revolution 2000 will ensure you don't need to carry a spare.
We can treat all 4 wheels œPOA
|
Below you can take a closer look at the 80 Litre ellipsoid tank and its bespoke installation frame, to ensure the highest quality tank installation.
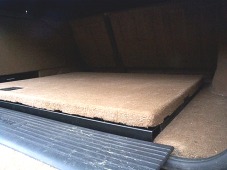 |
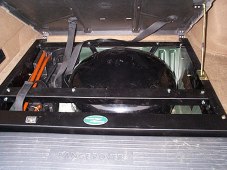 |
This new & unique mounting - frame (cassette system), by design, allows for the use of our exclusive '4, Hole' Ellipsoid Tank.
Making full use of the limited space available
|
More 4.0 & 4.6 Lpg Tank options and information here on our FAQ LPG section,
 Koni Suspensions. Koni Suspensions.
A Handling transformation, for the 4.0 and 4.6 HSE. |
'Click here' for full details on our Koni suspension pages
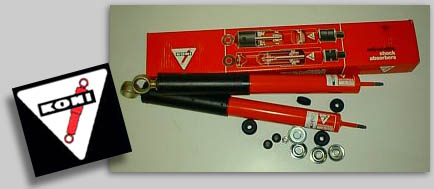
World class suspension, (Shown here for V8 SD1 Saloon car)
The Latest Rover Air suspension, is only a conventional 'Air bags as springs system' with an added computerized ride height, (pressure) control, other than that they still have low specification shocks as per all previous models,
Most noticeable,, Its the lack of 'rebound' control/stability of std shocks, that makes the Rovers feel so limp, Konis are valved to control rebound better, this ensures you get the handling without the harshness of 'over valved' hard ride shocks.
Notwithstanding this, I am sure some of the £3k complete suspension packages out there may do a bit more, but sure willcost a lot more.
You & moreover your passengers will appreciate the uncompromising body roll control, and improved ride, for sure and you wont find it a harsher ride either,
Koni has been our choice for the last 20 years
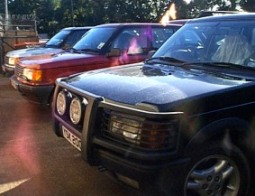
A Line up of HSE's, Two 5.2 V8s and a 4.6 V8, two running on LPG., and all on Koni. Suspension. To further compliment the Std, air suspension systems.....
|
 |
|
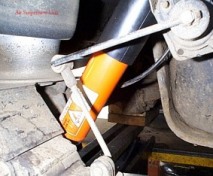 |
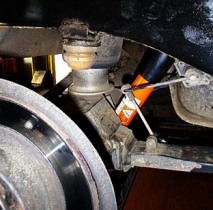
| Koni Fitted To HSE, Rear |
|
Close-up shows the Air suspension Unit. |
Make that 'Body Roll' a thing of the past, With Koni..
(Myth) The air suspension systems of the LSE & Newer Shape Range Rover models replaces the need for shock absorbers,
Wrong This is quite wrong for sure, as the air suspension unit is only doing the job of the springs, so shock absorbers remain, and are just as important,
Although the suspension on these models is a big improvement on conventional systems, 'Body Roll' is still an irritable, inherent Rover feature
Ahead of the std suspension and many cheaper options,, Konis will easily control and almost eliminate this by controlling suspension rebound. rather than creating a harsher ride.
Effectively flattening out the ride, holding much tighter on corners at all speeds. Thus comfort is in no way compromised allowing for a far more comfortable and assured ride 'Its instantly apparent'.
You are truly guaranteed to be amazed at the difference from such an inexpensive conversion.
 Stainless Performance Exhaust systems Cat, non Cat & Cat back systems. Stainless Performance Exhaust systems Cat, non Cat & Cat back systems. |
|
|
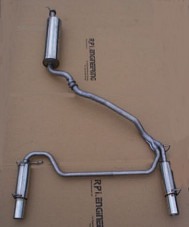 |
New
Stainless Steel Twin Exit rear pipes and main Silencer. from Rpi for the 4.0 and 4.6 HSE Range Rovers.
œPOA
|
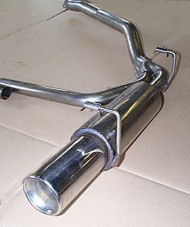
A Close up
of one of the silencer's shows the highest quality of manufacturer.
With this system fitted you cant hear anything, except perhaps a TVR 500 Griff, About 2 -3 miles behind (Perhaps),
Under heavy load and hard acceleration the TVR, seems to be somewhat closer.!!. |
 |
Typical comment, That says it all, I have just arrived home in Oslo/Norway in my overloaded `89 RR 3,9 SE( with RR and MG parts). The other day I installed the SS twin outlet exhaust system to my `95 4,6 HSE and as expected; it sounds like Verdi!!
Even my wife loves it!! The installation was very easy
|
 Full Performance Stainless Steel Systems for New Shape Range Rover 1995 to 1999. Inc Cats or Cat back only. Full Performance Stainless Steel Systems for New Shape Range Rover 1995 to 1999. Inc Cats or Cat back only. |
The latest performance exhaust system to be added to our range.
We will have further pictures soon,
This new complete Stainless Steel performance exhaust system with double exit twin outlet rear silencers is available complete with free flow 'Cats', as a full performance systemœPOA
Or without 'Cats', œPOA. And its sound is -- 'luscious'.
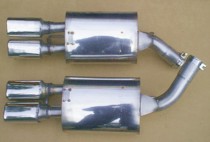
High performance Twin Stainless Steel tail rear pipe with double outlet pipes.
|
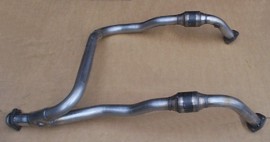
Full free flow .Stainless down Pipes with Free flow Cats.
|
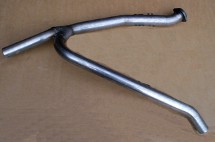
The Highest quality Stainless Exhaust system components.& Fittings. |
 Our latest 2001 Front Disc Brake Upgrade Kits for Range Rover and Discovery Our latest 2001 Front Disc Brake Upgrade Kits for Range Rover and Discovery |
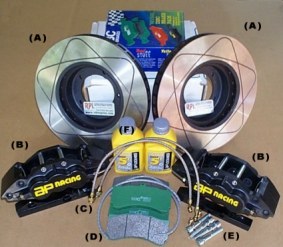 |
Massive stopping Power
From our unique, Top of the range
Vented Tri-Cam Disc upgrade
'6 Pot' Superlite Calipers,
brake pads and much more
Just one of the many Brake
upgrades we can offer for more,
"Click here" |
For race application or fast road & towing, we offer the Brake system upgrade you need. .
 Notes For Fitting New EPROM Chips Into The Lucas-Sagem GEMS ECU (information supplied by Mark Adams) Notes For Fitting New EPROM Chips Into The Lucas-Sagem GEMS ECU (information supplied by Mark Adams) |
Please take the trouble to read these notes, which are provided to help you obtain a successful installation. The notes should be read completely before starting work, as some time spent now could avoid tears later! It is not our normal practice to provide EPROM chips for self-fitting except in exceptional circumstances, since the results cannot be guaranteed. Self-fitting is performed entirely at your own risk. This information is provided for your guidance, and whilst every care has been taken it is not guaranteed to be error free or totally comprehensive.
The ECU (Electronic Control Unit) is easily damaged by Static Electricity (ESD or Electro-Static Discharge). Therefore you need to use extreme care when working inside the ECU. If you do not have the correct facilities then the risk can be reduced by working on an earthed metal workbench (a stainless steel sink draining board fits this description!), or a large sheet of aluminium kitchen foil. Avoid wearing man-made fabrics whilst performing this type of work if possible, since they tend to generate Static Electricity (suggest cotton or wool clothing).
Please note that the EPROM and its decoder board are not covered by warranty in case of ESD damage, or incorrect fitting (especially plugged in the wrong way around). A small charge is made for replacement in these cases.
Never disconnect the ECU whilst the ignition is switched on, and especially not while the engine is running. Never work on the ECU whilst it is plugged in, even though it is only powered up when the ignition is switched on. If anything is unclear then please do not hesitate to contact your supplier. There's no such thing as a silly question, except the one you didn't ask although you needed to….
FITTING INSTRUCTIONS.
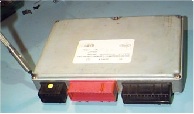
All screws used to assemble the ECU are TORX T20 M4. Place the ECU on an anti-static work surface with the label face up. Note that if you look carefully at the red connector in the centre, it is closer to the labelled side.
Remove the lid of the ECU by removing the five screws that secure it. |
 |
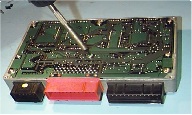 |
The circuit board itself may then be released by unscrewing the 8 screws that hold it in place, using the picture for assistance.
At this stage you will encounter the tamper-detection system. When one or two of the screws are released, a squirt of clear liquid will be released. This is quite harmless and it will quickly evaporate. However it does make you jump the first time it happens! |
The EPROM chips are always fitted in sockets in this type of ECU. There is a plastic cover over each one with the word LUCAS moulded on to it. The larger chip has a Blue cover, and the smaller one is Green.
The cover must be removed with pliers as shown in the picture on the right. Note that the pliers are used to grip the cover firmly at least half way up the sides,
|
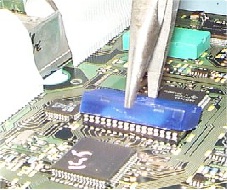
|
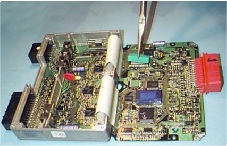 |
to avoid pinching the socket It may be necessary to rock the cover gently from side to side several times in order to release it from the circuit board - be patient and take your time! underneath. |
Now the EPROM itself may be removed as follows, again as shown in the picture on the left. Gently lever it out by placing a thin screwdriver blade between the chip and socket, and rotate the tip to prise it out.
Take great care not to bend the pins of the old EPROM as it comes out. Be very careful to avoid damage the circuit board or socket underneath.
Pay particular attention to the orientation of the chips. Pin one is marked by a notch in one end of the chip (nearest the main red connector for the GEMS ECU). |
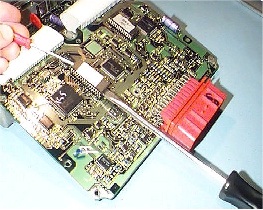 |
A new EPROM chip must be fitted the same way round as the one it replaces, or else it will probably be destroyed (fry and die!). The decoder board and the EPROM chip are marked with a red paint spot by pin number one, in addition to any manufacturer's markings. If you look at the socket on the circuit board you will see that that also has a notch at one end, which identifies the pin one end. However we have seen the sockets fitted incorrectly in the circuit boards, so the most important thing is to pay close attention to the way the original EPROM was fitted.
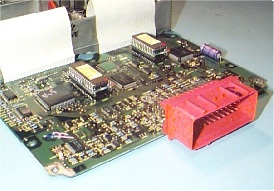 |
The fitting order of the components is as follows. The green decoder board fits into the socket on the ECU circuit board, and the EPROM fits into the decoder board. When fitting the new EPROM chip into the decoder board,
take time to ensure that all the pins enter the socket correctly. It is quite easy for one or two pins to fold underneath during insertion. A good firm press will be required to seat the devices in the circuit. The picture to the right shows the correctly fitted chip. |
Now reassemble the case and stick the provided label onto the outside of the ECU case.
Refit the ECU into the car by reversing the removal procedure. When the ignition is turned on for the first time without starting the engine, the fuel pump will be heard to run for three seconds and then stop. This is a good sign at this stage!
It is recommended that you retain the old chips and covers, and keep them in a safe place. This may be handy if you wish to retain the chips when you sell the vehicle, or in case the original ECU fails and needs to be exchanged one day (although they have proved to be exceptionally reliable in service so far). Please note that the chips cannot be replaced if you exchange them! Remember that the chips are still vulnerable to ESD deaths so please take care when handling them.
SETTING UP AFTER FITTING.
It is important to understand that the Lucas-Sagem GEMS system is adaptive, and it will "learn" how to manage the engine over the first couple of hundred miles. The rest of the process actually continues over the first 3,000-Miles. Therefore there is no explicit setting up process required.
When the new chips are first fitted, there will be a small improvement in performance which is noticeable immediately, but the real benefits will not be observed until a couple of hundred miles have been covered.
Tornado series EPROM chips provide full diagnostic capabilities, which are fully compatible with the Land Rover Test-Book and Autologic diagnostic systems.
TROUBLESHOOTING.
Due to the complexity of the Lucas-Sagem GEMS system, the chip upgrade should not be fitted if the vehicle has any existing engine faults. If in doubt then it is best to visit a dealer who is equipped with a Land Rover Test Book or Autologic diagnostic system and have the vehicle checked over. This is strongly recommended even where there is no obvious fault, although in 95% of installations there will be no problems.
If you have problems then don't panic! Your supplier can help you here. Most of the mistakes you can make have been made before. Just be honest and then we can help you. If there is any problem with the chipset then it will need to be returned for inspection before it can be replaced.
1. The fuel pump either doesn't run for three seconds, or runs continuously when the ignition is turned on. Oh dear. At least one chip is probably plugged in the wrong way round, or one of the legs is bent underneath, or the ECU has been damaged during the process, or the EPROM/ECU is not plugged in yet.
2. I plugged in the EPROM chip the wrong way round and realized after I switched it on. In this case it is almost always the EPROM chip and/or the decoder that is damaged, not the ECU. The best thing to do here is confess, and a replacement can be issued at a reasonable cost upon return of the dead one. Both the EPROM and the decoder contain unique signatures that are destroyed by incorrect connection.
3. The vehicle is difficult to start, or runs poorly. This type of behavior usually means that there are fault codes in the ECU. It is most likely that this behavior was apparent before the chip upgrade was fitted. However in certain cases the upgrade can expose or highlight a previous fault. The cure for this is a visit to a dealer equipped with the Land Rover Test Book or Autologic diagnostic system.
Warnings.
When working with GEMS vehicles. Never try to locate a misfire by pulling plug leads off - pull the injector connector instead. Otherwise you can blow up the ECU.
. Secondly never swap ECUs between vehicles to test them, because both vehicles and ECUs may stop working, and you'll have to have them all reset by a franchised LR dealer (ouch!).
|


